
make your own photo corners
6:38:00 PM
I am not a huge fan of punches...except for the odd ones like a corner rounder, circles and squares. Anything else that I can make myself is a plus. Like the fact that I can use my square punches to make photo corners out of any cardstock and paper to match my projects. Here's a quick how to.
Supplies: Cardstock Bazzill Basics. Punch McGill.
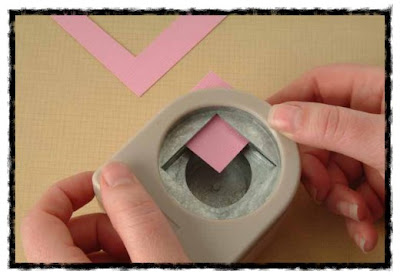
step 1: punch a square out of cardstock. Use any punch size that you desire. The larger your square the larger your corners will be. step 2: insert your punched square back into the same punch with a 1cm (1/2 inch) of the edge revealed on the outside, and punch a smaller square out of the one corner.
 step 3: once you punch your smaller square you will be left with just an outside edge. Cut the ends at an angle to form your corner. You can make them as big or as small as you want to.
 Decorate your corners to make them truly unique. Ink the edges to define your corners, stamp onto tthem to add a pattern, paint them, distress the edges, punch small circles in them and back with a plain coloured cardstock or leave them as is. The choice is yours.
 step 2: insert your punched square back into the same punch with a 1cm (1/2 inch) of the edge revealed on the outside, and punch a smaller square out of the one corner.
 step 3: once you punch your smaller square you will be left with just an outside edge. Cut the ends at an angle to form your corner. You can make them as big or as small as you want to.
 Decorate your corners to make them truly unique. Ink the edges to define your corners, stamp onto tthem to add a pattern, paint them, distress the edges, punch small circles in them and back with a plain coloured cardstock or leave them as is. The choice is yours.


0 comments